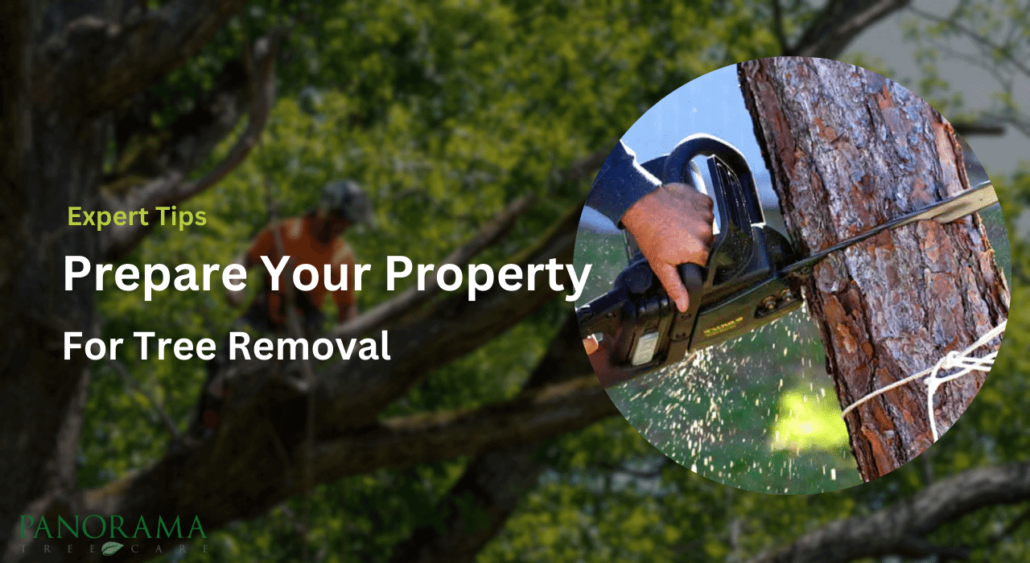
TL;DR: To prepare your Tampa property for the removal process, handle paperwork (HOA and Tampa permits), schedule 811 utility marking, clear vehicles and yard items, secure pets and kids, and make sure crews have wide, safe access.
A little prep dramatically reduces risk, damage, and delays — and helps keep removal cost in check on the day. Whether you hire a tree removal crew in Tampa for a single backyard pine or a multi-tree clearing, the same checklist applies.
Key Takeaways
- Seven essential steps before removal day: call 811, verify your Hillsborough permit, notify neighbors, clear vehicles and furniture, secure pets, provide access, and mark sprinklers/irrigation. Doing these early keeps the crew working instead of waiting.
- Tampa-specific prep includes HOA architectural review, Hillsborough County permit verification, TECO and Tampa Water utility marking, and planning for narrow South Tampa streets that fill with cars by sunrise.
- Drop zone and staging areas must be cleared of vehicles, patio furniture, grills, toys, and decor well beyond the canopy spread so riggers can swing limbs without threading a needle.
- Property protection involves driveway plywood, pool covers, temporary fence panel removal, and protecting turf and landscape beds from tracked machines and falling debris.
- Typical removal day timeline: 30–60 minutes for setup, a few hours of cutting depending on tree size, and 1–2 hours of cleanup and final walkthrough, with noise most of the day.
- Safety first: keep children and pets indoors or off-site, respect cones and tape, and do not walk into the work zone while crews are operating, even if it “looks quiet.”
- Panorama Tree Care site prep usually includes equipment placement, ground protection, and cleanup, but homeowners are still responsible for moving personal items and confirming permit/HOA status.
- Weather, access, and missing permits are the three most common sources of delay, and planning for these in advance keeps your project on schedule and your crew from turning around in your driveway.
What Is “Preparing Property for Tree Removal”?
Preparing property for tree removal means taking care of all the behind-the-scenes work before the first chainsaw ever starts. In Tampa that means confirming permits and HOA approval, calling 811 Call Before You Dig for utility marking, clearing vehicles and yard items, arranging safe access for equipment, protecting driveways and pools, and making sure pets, children, and neighbors are safe and informed.
Done right, this prep work keeps the job from turning into an emergency. Crews spend less time dodging obstacles, you avoid surprise damage to utilities or landscaping, and the whole removal day runs smoother and safer for everyone around the property.
Homeowner Preparation Checklist (7 Steps Before Removal Day)
There are a lot of moving parts in a tree removal, but from the homeowner side it boils down to a short list. Knock these out a few days before the crew pulls up and you’ll avoid most of the headaches I see on jobs that go sideways.
Call 811 for utility marking, verify your Hillsborough County permit, notify nearby neighbors, clear vehicles and outdoor items from the drop zone, secure pets, ensure wide gate access, and mark sprinkler heads and irrigation lines before removal day.
1. Call 811 for Utility Marking
Anytime heavy equipment, stump grinding, or root removal is planned, you should contact 811 Call Before You Dig so underground utilities can be located and marked. Stump grinders do not care what is under the soil, but the utility companies definitely do. Whether you’re booking professional stump removal in Tampa or scheduling a crane crew, this step protects gas, water, and irrigation lines.
Why it matters in Tampa: Our big live oaks and older water systems are a bad combination. In a lot of Tampa neighborhoods, tree roots are wrapped around or sitting right on top of water lines, gas lines, and cable conduits. One pass with a grinder or a skid steer in the wrong spot can cut your cable, snap a water line, or worse, open up a gas leak that gets your whole street evacuated.
Key details for 811 utility marking:
- Call timing: Put in the request at least 2–3 business days before work is scheduled. Utility locators run busy, especially after storms or during big construction pushes, so early is always better.
- Tampa response time: In most parts of Tampa, utility companies mark lines within 2–3 days of your 811 request, weather and workload permitting. Rain and soaked ground can slow them down.
- Free service: 811 locating is free for homeowners. It is paid for by the utilities, so you’re not saving anything by skipping it, you’re just taking on more risk.
- Coverage: Marking usually covers public utilities only such as power, gas, water, sewer, and communication lines. Private irrigation, pool lines, low-voltage landscape lighting, or propane yard lines from a private tank are not included, so those still need your attention.
- Marking colors (standard):
- Red – electric power
- Yellow – gas, oil
- Blue – potable water (Tampa Water)
- Green – sewer/drain
- Orange – communication/cable
- Purple – reclaimed water
- White – proposed works (where work is planned)
Your tree company reads those colors like a map. They’ll plan rigging, stump grinding, and machine routes around those marks. If you’re working with Panorama Tree Care, ask during booking whether they’ll submit the 811 ticket or if they want you, as the property owner, to handle that call. Either way, make sure someone does it.
2. Verify Your Hillsborough County Permit
This page focuses on preparation, not permit application, but skipping this check is one of the fastest ways to get a visit from code enforcement or to have a job shut down halfway through.
Homeowner responsibilities:
- Confirm whether your tree needs a Hillsborough County permit or a City of Tampa authorization. The line can be odd in some pockets, so verify which side you’re on, not which mailing address you use.
- Verify the permit number and that its status shows “issued” or “approved,” not just “applied for.” Crews shouldn’t be cutting on a pending permit.
- Keep a printed or digital copy handy on your phone or in a folder. Inspectors sometimes stop by unannounced, and neighbors will absolutely ask if they already complained about the tree once.
If you’re unsure how permitting works or whether your tree even qualifies, check a detailed permit guide or talk to your arborist before you lock in a removal date. It’s much cheaper to postpone a job than to face fines or be ordered to replant multiple replacement trees.
3. Notify Neighbors
Tree removal is not a quiet backyard project. There are chainsaws, chippers, backup alarms, and sometimes streets partly blocked by trucks. Giving neighbors a heads-up is simple, but it saves a lot of drama.
Best practices for neighbor notification courtesy:
- Let directly adjacent neighbors know at least 2–3 days before the work. A quick text, door knock, or note on the door works fine.
- Be clear about:
- The date and rough time window crews will be there
- The type of noise to expect (chainsaws, chippers, truck beepers)
- Any temporary parking or driveway impacts and which side of the street you’re trying to keep open
- If limbs hang heavily over a neighbor’s yard, let them know crews may need brief access to their side for safe rigging or cleanup. Most people are cooperative when they understand you’re removing a risk from their property too.
In tighter South Tampa neighborhoods where everyone fights for curb space, give extra notice so neighbors can move vehicles the night before. I’ve seen more delays from blocked access on those narrow streets than from broken equipment.
4. Clear the Zone (Vehicles, Furniture, and Yard Items)
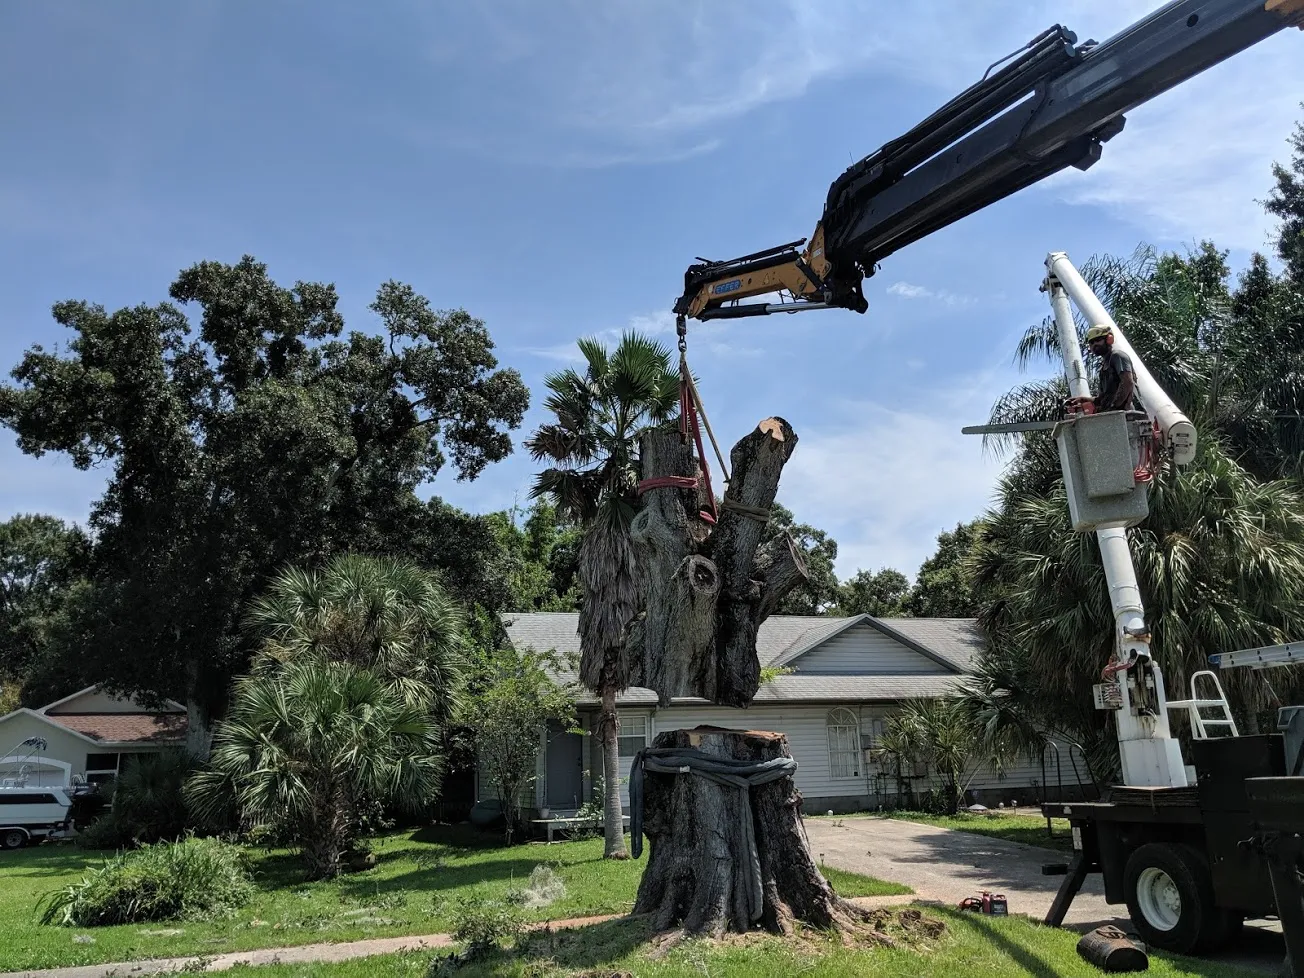
Looking up at the trunk and branches is only half of the story. On removal day, crews need two main areas: a clear drop zone under and around the tree, and a separate equipment staging area where trucks, chippers, and loaders can sit and work.
Understanding Drop Zone Clearance
Drop zone clearance is the safety bubble around the tree where branches or trunk sections may be lowered or swung by rigging lines. That bubble needs to be big enough that climbers and ground crew can move wood without worrying about your grill or patio set.
- Minimum radius: For big removals, crews prefer a cleared radius close to the tree’s full height, especially if the tree is being felled or craned. In tight yards, they may work smaller, but that increases rigging complexity and time.
- Furniture removal zone: Move patio furniture, planters, grills, and decor at least 15–20 feet beyond the outer edge of the canopy. In practice, if a limb could swing into it, move it farther.
- Vehicle relocation distance: Park vehicles at least 30–40 feet away from the tree and out of the equipment’s traffic path. Street-parked cars under the canopy are asking for dented roofs and broken glass.
- Pet exclusion zone: Keep pets at least 50 feet away and fully contained indoors, in a secure room, or at daycare. Dogs bolting under a rigged limb are dangerous for the crew and the animal.
- Equipment staging area: Plan on roughly 200–400 square feet of reasonably flat space, like a double-wide driveway or extended curb area, for chipper, trucks, and a log loader. Tight staging slows everything down.
What to Move Before Crew Arrival
Anything light enough for you to move is something you should plan to move yourself. Crews can handle wood, not your patio decor inventory.
- Cars, boats, and trailers from the driveway or right in front of the house where trucks need to back in
- Patio furniture, umbrellas, grills, smokers, and fire pits in the drop zone or along the likely access route
- Potted plants, garden sculptures, bird baths, and anything fragile that could crack if a branch brushes it
- Portable playsets, trampolines, and portable basketball hoops that crowd the work zone
- Decorative lighting, string lights, and hanging plants around the tree or along the access path that ropes or loaders could snag
Some companies, such as Panorama Tree Care, may help move small items if you get stuck. But they usually won’t take responsibility for your belongings if they’re left in the work area. If you’d be upset about it getting scuffed or broken, get it out of there ahead of time.
5. Secure Pets
Tree removal is loud and chaotic from a pet’s point of view. You have strangers in helmets, strange machines, beeping trucks, and open gates. That’s the perfect recipe for a spooked animal to bolt.
Best options for pet containment:
- Keep dogs and cats indoors in a closed room away from exterior doors and the main yard access. Turn on a fan or TV to help muffle some of the noise.
- Use pet daycare or drop them at a friend’s place if they’re highly anxious or have a history of trying to escape during storms or fireworks.
- Confirm that all gates are latched at the end of the job. Ask the crew lead for a quick “gate check” before they pull off, especially if you have side yards that are easy to miss.
Crews are watching ropes, saws, and overhead hazards, not scanning for pets underfoot. Keeping animals contained keeps everyone safer and prevents you from spending the afternoon searching the neighborhood.
6. Provide Access (Gates, Driveways, and Streets)
Most headaches I see on removal day have nothing to do with the tree. They come from tight gates, blocked driveways, or streets that look like a parking lot. Good access lets the crew use the right equipment, which usually means faster work and less risk to your yard.
Gate Access Width
Many professional stump grinders and compact loaders are designed to fit common residential gates, but there’s still a minimum they need to squeeze through.
- Ideal gate width: 36–48 inches works for most residential equipment, including walk-behind stump grinders and compact loaders used in Tampa yards.
- If your gate is narrower, your provider may need:
- Smaller walk-behind machines often mean more time and possibly higher cost for the same job
- Or temporary fence panel removal to create a wider opening for a more efficient machine to pass through
Measure your gate opening yourself with a tape measure. Don’t guess. Send that measurement to your tree company in advance so they can schedule the right equipment. Panorama Tree Care or any serious provider will appreciate not getting surprised by a 28-inch gate on arrival.
Driveway and Street Access
- Clear cars from driveways so trucks can back in and lay down driveway protection like plywood or ground mats. They can’t protect what they can’t access.
- On narrow South Tampa streets, coordinate with neighbors so there’s enough curb space for:
- A chipper truck close to the work zone
- A log truck or trailer if the tree is large and wood is being hauled out
- A crane, if a crane removal has been planned due to limited drop zone or leaning trees
- Tell your tree company if your driveway has pavers, hollow spots, weight limits, or existing cracks. They might choose a different parking or access plan to keep from turning a hairline crack into a full break.
7. Mark Sprinklers and Irrigation
Sprinkler and irrigation damage is one of the most common post-job complaints, and most of it is avoidable. 811 does not locate private irrigation or pool plumbing, so this step really does fall to the homeowner.
- Use small flags or bright spray paint to:
- Mark sprinkler heads near the tree, access paths, and along the driveway where machines might roll
- Outline visible drip lines, valve boxes, or control boxes so crews know where not to park or pivot equipment
- Tell the crew leader about:
- Any known shallow irrigation lines that have been repaired or moved in the past
- Pool plumbing near the stump, screen enclosure, or main access route from the street
Once those heads and lines are flagged, crews can plan plywood or mats to bridge over them or adjust their routes. Without that information, they’re left guessing, and guesswork is how you end up calling an irrigation contractor after the fact.
Tampa-Specific Preparation Steps (HOA, Permits, Utilities)
In Tampa, tree removal prep often includes HOA pre-approval, verifying your Hillsborough County permit, requesting TECO and Tampa Water utility marking through 811, and planning parking for large trucks on narrow South Tampa streets.
HOA Pre-Approval in Tampa Neighborhoods
Plenty of Tampa subdivisions and condo communities treat trees as part of the community’s look and value. That’s why many of them require a Tampa HOA architectural review before any major tree work, even if the county or city already approved the removal.
Typical HOA Pre-Approval Requirements
- Submission timeline: Get your HOA approval request in at least 10–30 days before your planned removal date. Some boards only meet monthly, and I’ve seen projects delayed a full month because paperwork was sent in too late.
- Required documentation:
- A copy of the Hillsborough County permit or City of Tampa authorization if one is required for that tree
- An arborist letter or report explaining the tree’s condition, defects, disease, or risk, plus the recommended action
- Photos or a simple sketch showing the tree’s location relative to the house, street, and any neighbor properties
- Approval response time: Many associations respond within 7–14 days, but some stretch longer around holidays or if a committee must review large removals.
- Emergency exemption: If a tree is a clear hazard, like storm-damaged, leaning badly, or uprooted after heavy rain, some HOAs allow emergency removal with fast-track or post-removal review. Get written email confirmation or a signed note so you’re covered later.
To stay out of hot water with your HOA, don’t schedule a crew until you have written approval. Verbal “should be fine” answers over the phone are not much help if a board member complains while the crane is already set up in front of your house.
Hillsborough County Permit Verification
Permit rules and exemptions change over time, but verifying the permit you already applied for is straightforward. This check is quick and saves you from mid-job headaches.
- Make sure your address and parcel number exactly match what’s listed on the permit. Mismatched parcels can cause issues if an inspector drives by.
- Confirm the permit status shows “issued” or “approved”, not “submitted,” “in review,” or anything similar. Crews shouldn’t start work until that status flips.
- Read any special conditions, such as required replacement planting or re-landscaping. Some permits require you to plant new trees or keep specific species on the lot.
Your tree service may help check status or even submit the permit on your behalf, but the fines and enforcement come back to you as the property owner. Make sure you’re comfortable with what the permit allows before anyone climbs the tree.
TECO and Tampa Water Utility Marking
While 811 coordinates all the different utilities, the two big names most Tampa homeowners deal with are TECO and Tampa Water.
- TECO utility marking (Tampa Electric) will mark buried electric runs in red, especially those feeding older homes where service lines don’t always follow a straight, obvious path.
- Tampa Water utility marking will flag potable and sometimes reclaimed water lines in blue or purple so stump grinders and loaders don’t straddle them during removal.
When you call 811, tell the operator you have heavy equipment, stump grinding, or root removal planned around mature trees. That note helps make sure the appropriate utilities are notified and show up before your removal date so the crew isn’t standing around waiting on paint marks.
Parking Considerations for South Tampa and Urban Areas
In older Tampa neighborhoods, the streets were never designed for modern work trucks, much less a crane, chipper, and log truck at the same time. Add in street parking on both sides and you have a tight fit.
- Ask your tree company which side of the street they prefer for staging and which driveway or curb areas they absolutely need open.
- Move your own vehicles the night before into a secondary location, not just one house down where they still block access.
- Talk to neighbors about keeping certain curb spots clear during your work window. A friendly chat ahead of time is easier than asking somebody to move at 8 a.m. when the crane is idling in front of your house.
- Confirm any city restrictions about blocking sidewalks, alleys, or part of the roadway. Some streets may require cones, signage, or specific parking angles for work trucks.
On tight right-of-way lots, your provider may recommend crane removal instead of traditional rigging to keep wood off fences, roofs, and fragile landscaping. Crane work looks intense, but in some Tampa yards it’s actually the safest and least invasive option.
What to Expect on Removal Day (Timeline & Process)
On removal day, expect crew arrival and introductions, 30–60 minutes of equipment setup, several hours of active cutting and rigging depending on tree size, 1–2 hours of cleanup, and a final walkthrough. Noise levels are high and may affect nearby neighbors.
Knowing how the day usually unfolds helps you plan your own schedule. You’ll know when the loudest work happens, when you should be available to answer questions, and when to walk the yard with the crew leader before they head out.
Typical Removal Day Timeline
Every tree is different, but most Tampa residential removals fall into these rough time ranges. Poor access, tight drop zones, or delicate landscaping can push times higher.
| Stage | Typical Duration | Notes |
|---|---|---|
| Setup time | 30–60 minutes | Parking, equipment staging, safety briefing, and laying ground protection on driveways and lawns. |
| Small tree removal (ornamental or palm) | 1–3 hours total | Minimal rigging, often just a few cuts and a quick cleanup, especially for smaller palms or ornamentals. |
| Medium tree removal | 3–6 hours | Common for decent-sized oaks or pines with good access and manageable overhangs. |
| Large or complex tree | 6–10+ hours | Involves heavy rigging, crane work, multiple stems, or obstacles like roofs, pools, or power lines. |
| Cleanup time | 1–2 hours | Haul off wood, chip brush, rake and blow debris, and complete the final walkthrough. |
Arrival and Pre-Work Walkthrough
Once the crew rolls up, the first few minutes are about getting everyone on the same page. That quick walkthrough is more important than most homeowners realize.
- Crews usually arrive within a set time window, like 8–10 a.m., depending on traffic and other stops.
- The crew leader will knock on your door for a short walkthrough to confirm:
- Exactly which tree or trees are being removed and what’s staying
- Any special concerns such as septic tanks, shallow utilities, pavers, or pools
- Where trucks and chippers will be parked and which gates or access points they’ll use
This is your chance to double-check that the Panorama Tree Care site prep plan or any other company’s plan lines up with what you expect. If you want wood left for firewood, or have areas you absolutely do not want machines crossing, speak up now.
Equipment Setup and Safety Perimeter
During the setup phase, you’ll see a lot of movement but not much cutting yet. This is where crews get things in place so the rest of the day runs smoothly.
- They’ll place plywood or ground mats on driveways and high-traffic lawn areas to spread out weight and limit ruts and tire marks.
- Chipper trucks and, if needed, cranes will be backed into position for safe, efficient feeding and lifting.
- Cones, caution tape, or barricades are set to build a clear work zone where only crew members should be entering.
- The foreman checks for 811 markings, irrigation flags, overhead service lines, and low tree limbs that might interfere with equipment.
During this time, it’s best to stay inside or well clear of the work area. People walking behind trucks or under set ropes while crews are focused on setup is one of the easier ways to create a close call.
Active Removal: Noise and Neighbor Impact
Once climbers are in the tree or the crane starts lifting, the real work begins. From that point on, the yard is effectively a construction site in the air.
- Expect steady chainsaw, chipper, and diesel engine noise with some lulls as rigging is reset or equipment is moved.
- Backup alarms on trucks and loaders will sound often as they reposition for brush and log loading.
- Street or sidewalk access might be temporarily blocked while large pieces are swung or moved to the truck. Crews usually try to keep delays short, but neighbors should expect brief waits.
Early neighbor notification makes days like this a lot easier. If people already know what’s happening and for how long, they’re less likely to get upset about noise or a blocked driveway for a few minutes.
Cleanup and Final Walkthrough
After the last big section comes down, the crew’s rhythm shifts from cutting to cleanup. This is where your property starts to look like a yard again, not a job site.
- Remaining limbs and logs are loaded out or stacked, depending on what you arranged in your estimate.
- The team rakes and blows sawdust and small debris from turf, beds, and hard surfaces like patios or sidewalks.
- Plywood and ground mats are pulled up, and crews do a quick check for any tools or debris left behind.
- The crew leader walks the area with you for a final walkthrough:
- Confirming stump handling, whether it’s left tall, cut low, or scheduled for grinding
- Checking gates, fences, and access points to make sure everything is closed and reasonably tidy
- Pointing out any minor turf disturbance, root lifting, or areas that might need a little time to recover
Reputable companies won’t try to hide incidental damage. If something happened, they should tell you and talk honestly about how they plan to address it or what’s normal wear and tear from this type of work.
How to Protect Your Property During Tree Removal
Protect your property by using plywood or ground mats on driveways, covering pools, temporarily removing fence panels for better access, and marking or shielding landscaping. Tree services typically handle heavy protection and cleanup, while homeowners handle moving personal items and confirming special concerns.
Key Property Protection Measures
Done carefully, tree removal shouldn’t leave your place looking like a construction zone months later. Good property protection measures focus on the areas most likely to see heavy traffic or falling debris.
- Driveway protection with plywood or composite ground mats under heavy trucks and loaders to spread the load and reduce cracking or scuffing.
- Landscape protection by flagging beds, setting small barriers, or rerouting equipment around delicate plants and hardscape features.
- Pool protection using solid or mesh covers, and in some cases temporary tarps, to keep sawdust, leaves, and small wood chips out of the water.
- Fence accommodation through temporary fence panel removal where a straight access path saves yards of turf and keeps machines from tight squeezes against structures.
- Irrigation marking with flags and paint so crews can avoid running machines across shallow piping or heads.
Driveway Protection: Plywood and Mats
Driveways are often the only place heavy trucks can safely stage, but concrete and pavers aren’t invincible. As part of Panorama Tree Care site prep or a similar professional setup, crews usually lay 3/4‑inch plywood or heavy-duty ground protection mats before driving equipment over your hard surfaces.
Homeowner tips:
- Tell your provider if you have pavers, stamped concrete, thin overlays, or older cracked slabs. These surfaces can shift or chip under point loads, so the crew may adjust where they park.
- Ask where trucks will sit and which sections of driveway will take the most weight. That helps you understand why certain parking spots or access points matter.
- Move all vehicles out before work starts. Once the chipper truck is in the driveway, you may not be able to get your car out without interrupting work and increasing risk.
Pool and Screen Enclosure Protection
In Tampa, a lot of big trees sit right next to pools and screen enclosures. Without protection, sawdust and debris can cloud a pool and leave screens littered with small branches.
- Use a pool cover whenever you can. A solid safety cover blocks fine dust and small chips better than a thin solar cover, but anything is better than nothing.
- If you don’t own a cover, ask whether the tree company can tarp nearby areas or rig limbs in a way that keeps most debris out of the pool.
- Keep any glass doors or sliders to the pool area shut during the work so dust and noise stay mostly outside.
After the job, a quick skim and filter cleaning usually handles whatever made it through. For challenging setups where big limbs hang directly over a pool, talk through the plan during your estimate so no one’s surprised on removal day.
Fence Panel Removal for Better Access
Trying to squeeze equipment along a narrow side yard with a tight turn usually means damaged turf and more risk to walls and AC units. In many cases, it’s cleaner and safer to temporarily remove a fence panel and go straight in.
How it works:
- Identify which panel gives the straightest shot from the street or driveway to the tree with the fewest turns.
- Decide who will take it down and put it back:
- Some tree companies offer fence panel removal as an add-on service and will include it in the estimate.
- Others prefer the homeowner or a handyman handle it so it matches the existing fence style and hardware.
- Schedule removal ahead of the crew arrival and reinstallation after cleanup so there’s no delay once trucks are on site.
A single panel taken down in the right spot can save dozens of feet of turf from ruts and help the crew avoid cutting tight corners by your AC condenser, pool equipment, or fragile landscaping.
Landscape and Irrigation Protection
Protecting your yard is a shared job. You know where the hidden problems are. The crew knows how their machines move and what they can safely avoid.
- Homeowner: Flag prized plants, mark irrigation heads and known lines, move delicate pots, and point out anything invisible like septic lids, French drains, or buried cables. If you care about a bed or feature, call it out.
- Tree company: Use controlled lowering techniques, crane work where needed, and thoughtful routing of equipment to keep traffic off flagged areas and avoid driving over obvious hazards.
During your estimate, walk the property and show the estimator where your irrigation runs, where your lawn tends to stay wet, and which beds you’re willing to sacrifice if needed. That’s also a good time to ask about any extra preparation steps before removal that might raise or lower the price, like leaving wood on site or handling your own debris.
Who Handles What: Homeowner vs Tree Service
Responsibility lines get blurry if they’re not spelled out. Before you sign anything, you should know which tasks are on you and which belong to the crew.
- Tree service typically handles:
- Driveway and turf protection with plywood, mats, and careful machine operation
- Debris containment, chipping, and cleanup of tree material from the work itself
- Safe setup and removal of rigging, saws, and heavy gear
- Reasonable care to avoid marked public utilities and clearly flagged irrigation
- Homeowner typically handles:
- HOA pre-approval and Hillsborough permit verification or City of Tampa authorization where required
- Moving vehicles, patio furniture, decor, and other personal items out of the work areas
- Securing pets and arranging supervision for children during active work hours
- Marking private irrigation, pool pipes, low-voltage lighting, and fragile landscape features that are not obvious to an outside crew
Ask your estimator to walk through this breakdown verbally and make sure it matches what’s written in the proposal or work order. Clear roles on the front end keep misunderstandings from popping up later.
Common Mistakes Tampa Homeowners Make (and How to Avoid Them)
Most problems I see on removal day come from things that could have been fixed with a couple of phone calls or 10 minutes in the yard the day before. Here are the big ones and how to sidestep them.
Mistake 1: Skipping 811 Because “We’re Not Digging”
Problem: Stump grinding and root removal absolutely count as digging. The blades chew deep into the soil and can hit unmarked water, gas, or electrical lines without warning.
Fix: Always request 811 utility marking at least 2–3 business days before stump work or any heavy equipment use near roots. Treat it as non-negotiable, even if the stump is in the middle of the lawn.
Mistake 2: Assuming the Tree Service Handles HOA and Permits
Problem: Jobs get scheduled, crews show up, then someone realizes the HOA never approved the removal or the county permit is still pending. That can mean delays, cancellation fees, or fines.
Fix: Treat HOA pre-approval and Hillsborough permit verification as yours to manage unless your contract clearly says the tree service is handling them. Get written confirmation and keep digital or printed copies ready in case anyone asks.
Mistake 3: Not Moving Vehicles or Yard Items in Time
Problem: Cars under branches, trailers in the driveway, or grills sitting in the drop zone cause delays and increase the chance of damaged property. Crews either work around them slowly or stop and wait for you to move them.
Fix: The night before, clear out the entire drop zone clearance and the planned equipment staging area. Move vehicles 30–40 feet away and take a couple of “before” photos of your patio setup so you can put everything back exactly how you like it later.
Mistake 4: Underestimating Noise and Neighbor Impact
Problem: Neighbors wake up to early chainsaw noise, blocked driveways, or a chipper running under their bedroom window without any warning. That’s how complaints and calls to the city start.
Fix: Give neighbor notification courtesy at least 2–3 days in advance. Share the rough schedule, the kind of noise they can expect, and any parking requests. A simple note or text usually keeps everyone on your side.
Mistake 5: Forgetting About Pets and Children
Problem: Gates are open, machines are moving, and kids or pets find their way into the yard because “they just wanted to see the crane.” That’s a serious safety issue and stops work immediately.
Fix: Plan pet containment and child supervision well before removal day. Treat the yard like an active construction site while crews are present, and set clear house rules that nobody goes outside without checking with you first.
Three Expert Prep Tips Most People Miss
- Take “before” photos: Grab quick shots of your driveway, fences, landscaped beds, and any items near the tree. It helps document the starting condition and makes it easier to remember where furniture and decor were placed originally.
- Confirm stump handling: Decide ahead of time whether stumps will be left, cut low, or ground. That choice affects access routes, cleanup, and the risk to irrigation or utilities near the stump.
- Ask about rain dates: Tampa weather can turn quickly, especially in summer and during hurricane season. Confirm your provider’s weather delay policy so you know how rescheduling works if storms or lightning move in.
FAQ: Preparing Your Property for Tree Removal in Tampa
Below are answers to common questions about keeping children safe, handling weather delays, what happens if damage occurs, how long to stay away from the work zone, and what your yard looks like right after the tree is removed.
1. Is it safe for my kids to be home during tree removal?
Yes, kids can be home, but for that day your yard is not a playground. Have them stay indoors or well away from the work zone the whole time. They can watch from a window if they’re curious, but never under the tree, near ropes, or close to equipment. Treat it like watching construction from a distance, not a front-row show.
2. What happens if the weather is bad on removal day?
In Tampa, crews keep a close eye on radar. High winds, lightning, and heavy rain make climbing and rigging unsafe and can turn a routine job into something dangerous fast. Most providers will reschedule for the next available dry day if the weather doesn’t cooperate.
Ask about their rain policy when you book, especially during hurricane season or the afternoon storm cycle in summer. Knowing how they handle partial days, lightning delays, or same-day cancellations helps you plan work and school schedules around it.
3. What if something on my property is damaged during removal?
Reputable companies carry liability and workers’ comp insurance for situations exactly like that. If damage happens, the crew should tell you right away, not try to hide it. Minor turf disturbance or small ruts are common with heavy work and usually recover, but damage to fences, structures, irrigation, or other obvious features should be discussed during the final walkthrough.
This is where your “before” photos and clearly marked sprinklers and special items help. They make conversations about responsibility and repair faster and more straightforwardly.
4. How far away should I stay while crews are working?
Stay outside the marked work zone and at least 50 feet from the tree and main drop area. Never walk under the tree or step over ropes while saws are running or limbs are moving. If you need to talk to the crew, wait until you see the climber is still and saws are quiet, then get the attention of the crew leader from a distance first.
5. What will my yard look like after the tree is removed?
Most services leave your yard raked and blown clean of sawdust and small wood chips. The obvious change is the missing tree and, if stump grinding isn’t included, a stump where it stood.
You might see some flattened turf where plywood sat or where machines traveled. In most cases, the grass rebounds within a few days or weeks. If you want stumps ground and areas fully restored with soil and sod, talk about those options during your estimate so they’re in the written scope.
6. Do I need to be home during the entire removal?
It helps to be home at least at the start and end of the job. You can confirm details in the morning and walk the property with the crew leader at the end. Many Tampa homeowners head out for part of the day once access is set and questions are answered, especially if they work from home and need quieter conditions than a chipper provides.
7. Will tree removal affect my utilities?
If you’ve done proper 811 utility marking and clearly flagged your irrigation and pool plumbing, there’s usually no impact on utilities. In the rare case a shallow line gets hit, the utility company or an irrigation contractor can usually repair it the same or next day.
Marking lines and talking through any known problem spots during the estimate is the best way to minimize this risk.
8. Where can I learn more about the actual removal process and options?
This guide focuses on preparing your property. For a full explanation of how trees are removed, including crane work, rigging strategies, and straight felling where it’s safe, review a detailed process page from your tree service. For cost factors, look for a separate cost breakdown that explains how tree size, access, risk, and cleanup options affect the final price.
Final Summary and Next Steps
Preparing your property for tree removal in Tampa really comes down to three main areas: paperwork, access, and protection. Handle your HOA and Hillsborough permit status up front, schedule 811 Call Before You Dig, and keep neighbors in the loop. Then focus on the physical setup: clear vehicles and yard items from the drop and staging zones, secure pets and children, provide wide gate and driveway access, and mark irrigation, pool plumbing, and key landscape features.
Contact our Tampa tree service team for a free assessment and estimate.
Once you take care of those steps, your crew can focus entirely on safe, efficient tree work instead of playing traffic cop or furniture mover. You dramatically cut down on the chances of damage, delays, and last-minute schedule changes.
For a deeper dive into whether to hire a pro or attempt DIY, including additional property prep for professional service considerations and safety limits for homeowner work, see: