TL;DR: In Tampa, your best window for tree transplanting is November through February, when heat, storms, and water demand are at their lowest. If you want that tree to live, it comes down to one thing: respecting the roots.
That means sizing the root ball correctly, root pruning months in advance, setting up the right planting hole for our sandy soils, and sticking to a disciplined watering routine for 1–3 years while the tree re-establishes.
Key Takeaways
- Best season: In Tampa, transplant trees from November through February. Cooler temps and shorter days reduce transplant shock, especially for stressed or larger trees.
- Root ball sizing: Plan for about 10–12 inches of root ball diameter per inch of trunk caliper. Keep the depth at roughly 60–70% of the diameter so you capture the feeder roots without going too deep.
- Plan ahead: Root pruning 3–6 months before moving is the difference between a tree that limps along and one that actually takes off again.
- New planting hole: Dig the new hole about 2× the width of the root ball and the same depth, with tweaks for Tampa’s loose, fast-draining sands.
- Post-transplant care: Expect daily watering for the first couple of weeks, then ease back over 6–12 months. Bigger trees may need consistent care for up to 3 years.
- Transplant shock: Some wilting and leaf drop are normal. Full recovery in Tampa typically takes 12–36 months, depending on species, size, and how well the move was done.
- Professional help: For large or high-value trees, a tree spade machine and an ISA-certified arborist dramatically increase survival odds.
- Panorama approach: Panorama Tree Care leans on UF/IFAS-backed methods, soil blends tailored to Tampa sands, and offers 12 months of establishment monitoring for professional transplants.
Quick Definitions: What Is Tree Transplanting?
What is tree transplanting? Tree transplanting means lifting an existing tree out of the ground with its root ball intact, moving it to a new site, and then nursing it through the stressful establishment period. It’s more like moving a living system than just picking up “a plant,” because roots, soil, water, and timing all have to line up.
What is a root ball? The root ball is the compact mass of roots and surrounding soil that stays attached to the tree when it’s dug up. On professional jobs it’s usually held together with burlap and a wire basket (B&B – balled and burlapped) or cut by a mechanical tree spade into a solid, cone-shaped mass that can be lifted without falling apart.
What is transplant shock? Transplant shock is the stress response after a tree is moved and suddenly has fewer roots doing the same amount of work. You see it as wilting, leaf yellowing, tip burn, leaf drop, and slow growth while the tree tries to rebuild roots and balance its canopy with its new, smaller root system.
When Is the Best Time to Transplant a Tree in Tampa?
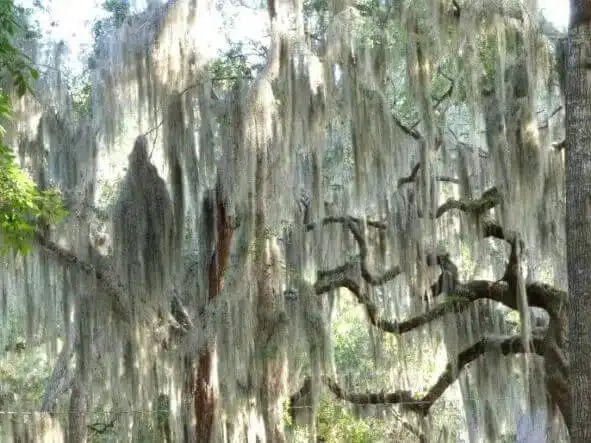
For Tampa’s climate, the best time to transplant a tree is November through February. Our winters are mild, but they still give trees a break from brutal sun, high humidity, and daily thunderstorms.
During this window, water demand drops, pests back off a bit, and the tree can quietly push roots into the new soil before spring heat hits.
The timing we use mirrors guidance from resources like the UF IFAS transplanting guide. The idea is simple. Move the tree when environmental stress is lowest and root growth potential is highest, not when it’s already fighting heat and drought.
Why late fall and winter are ideal in Tampa
- Lower heat and humidity: Cooler air and softer sun mean the tree loses less moisture through the leaves. That gives the reduced root system a fighting chance to keep up.
- Reduced pest and disease pressure: Many leaf-chewing insects, borers, and fungal issues quiet down in cooler months, so the tree isn’t battling as many problems at once.
- More energy for root growth: In our region, soil temperatures often stay warm enough for roots to keep growing even when top growth slows. That root-first growth is exactly what a freshly transplanted tree needs.
- Fewer thunderstorms: Freshly moved trees are poorly anchored. Fewer afternoon storms and strong gusts mean less risk of windthrow and leaning while the roots knit into the new site.
Why summer is risky for Tampa tree transplants
- High evapotranspiration: In summer, trees lose water fast through foliage. A tree that just had most of its roots cut back simply can’t pull water fast enough to keep up.
- Intense sun on foliage and root ball: Full sun can heat the root zone to damaging levels, especially if the root ball is exposed or dark. That stress stacks on top of the transplant shock.
- Water management is harder: Tampa summers swing between heavy downpours and blazing dry spells. Keeping soil “evenly moist” around a root ball in that mess is very tough, even with irrigation.
If you absolutely have to transplant in summer, do not wing it. Bring in a certified arborist, use aggressive shade and wind protection, and monitor soil moisture closely with a probe or at least frequent hand checks.
How to Size the Root Ball (Calculation by Trunk Caliper)
Root ball sizing is where a lot of projects go wrong. People underestimate how much root mass a tree actually needs to survive a move.
For most landscape trees, a solid starting rule is 10–12 inches of root ball diameter per inch of trunk caliper. Measure caliper about 6 inches above the soil line for trees up to 4 inches caliper.
Quick formula:
- Root ball diameter (inches) ≈ trunk caliper (inches) × 10–12
- Root ball depth ≈ 60–70% of root ball diameter
In Tampa’s sandy soils, I usually favor the upper end of that range. Sand doesn’t hold water or anchor roots like heavier soils.
For example, on a 3-inch caliper tree, I’d be looking more at a 36–40 inch root ball than trying to get away with 30 inches. That extra mass buys you stability and moisture buffering.
Root Ball Sizing Example Table
The table below gives you a rough feel for how big and how heavy these root balls get. This is where most DIY folks realize they’re not moving that tree with a wheelbarrow and a buddy.
| Trunk Caliper (inches) | Recommended Root Ball Diameter (inches) | Approx. Root Ball Depth (inches) | Estimated Weight (lbs) |
|---|---|---|---|
| 2″ | 20–24″ | 12–16″ | 250–400 lbs (approx.) |
| 3″ | 30–36″ | 18–24″ | 500–900 lbs (approx.) |
| 4″ | 40–48″ | 24–32″ | 1,000–1,800 lbs (approx.) |
| 6″ | 60–72″ | 36–45″ | 3,000–5,000+ lbs (approx.) |
(These are ballpark numbers. Wet soil and clay-heavy fill can push weights much higher than this.)
A root ball sizing chart like this tells you two things fast. First, how much of the original root system you’re actually moving.
Second, whether you’re in hand-digging territory or you’re calling someone with a tree spade machine, skid steer, or crane.
Tampa sandy soil adjustment
- Go slightly larger in diameter: As long as your equipment and access can handle it, bumping the ball size up a bit in sand improves anchoring and helps keep the root zone from drying out so fast.
- Avoid over-deep planting: Sand settles. If you plant deep, you’ll end up even deeper later. Keep the root flare clearly visible above grade and do not exceed the recommended depth.
- Consider wind exposure: In open yards or coastal areas, wind can rock a freshly moved tree. Larger root balls, staking, and proper guying help keep it upright while it roots in.
Step-by-Step Tree Transplanting Process
A proper tree transplant is a sequence, not a single event. You’re looking at planning, root pruning months ahead, careful digging, stabilizing the root ball, safe transport, then careful planting and aftercare.
Below is the process we actually use in Tampa, built around UF/IFAS-style best practices and a lot of real-world trial and error.
Step 1 — Root Pruning (3–6 Months Before)
Root pruning is the step nearly every homeowner skips, which is why so many DIY moves fail. You can move a tree without root pruning, sure. You just lose a lot more of the fine feeder roots, and survival drops fast, especially in our heat.
By cutting a ring around the tree’s root system several months before moving day, you signal the tree to push out new, fibrous roots inside that cut line.
Those are the roots that will sit inside your future root ball and actually keep the tree alive after the move.
- Timing: In Tampa, root prune 3–6 months before the planned move. For a transplant scheduled in December or January, that usually means late summer into early fall.
- Distance from trunk: Use your target root ball diameter based on the caliper formula, and make your pruning cuts just outside that circle so the new roots grow inside the future ball.
- Method (hand tools): For small to medium trees, a sharp spade or trenching shovel works. Cut a continuous ring 12–18 inches deep, straight down, to sever lateral roots.
- Method (larger trees): For big specimens, an arborist may use mechanical trenchers, air spades, or do the pruning in phases to avoid shocking the tree all at once.
Expert tip: After root pruning, mulch the root zone 2–3 inches deep and start a consistent watering schedule. You’re basically “preparing” a compact, fibrous root system inside the line you just cut.
Step 2 — Digging the Root Ball
Transplant day is where all that planning either pays off or falls apart. The goal is to excavate the root ball to your planned size and move it without cracking or stripping soil away from the roots.
Hand digging a root ball
- Mark a circle on the soil surface equal to your planned root ball diameter. Use spray paint, flour, or even a rope and stake as a compass.
- Start a trench just outside the circle and work your way down, then angle inward under the ball to build a stable “mushroom” or cone shape that supports its own weight.
- Slow down if you start hearing roots snapping. You want to preserve as much fine root mass as you can and avoid breaking the ball apart.
- Once you’ve undercut enough, gently tip the ball onto plywood, a tarp, or a sturdy tree dolly so you can move it without tearing it up.
Using a tree spade machine
A tree spade machine uses hydraulic blades to slice around and under the tree in a clean, repeatable pattern. For the right size class, it’s faster, more uniform, and usually easier on the tree.
- Trunk diameter capacity: Most common spades handle trees up to around 4–6 inches caliper, depending on the specific model and soil.
- Root ball cut: Many spades cut root balls from roughly 30 to 72 inches in diameter, which covers a wide range of landscape trees.
- Success rate vs. hand digging: Used correctly, tree spades often give equal or higher survival rates on mid-sized trees, because the ball is compact and evenly shaped with fewer big roots torn.
- Availability in Tampa: A dedicated tree relocation service Tampa provider, like Panorama Tree Care, will usually have one or more spade setups and operators who know our soils and species.
Important: Do not lift the tree by the trunk. Always handle by supporting the root ball. A cracked ball means exposed roots and a tree that’s now in the danger zone.
Step 3 — Wrapping, B&B, Transport & Handling
Once the root ball is free, the clock starts. You need to stabilize it, protect it, and get it into the new hole without letting it dry out or get beat up in transit.
- B&B (Balled & Burlapped): Wrap the ball tightly with natural burlap, then lace it with strong jute twine. For larger trees, set the ball into a wire basket and tie it off so the soil can’t slough away during handling.
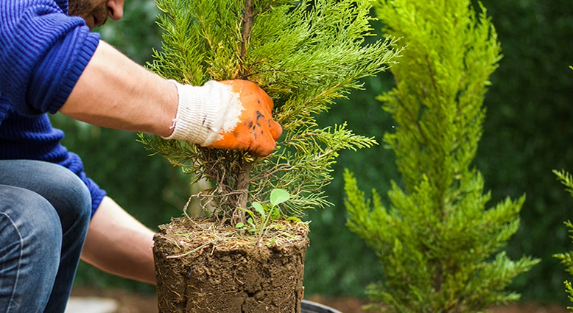
- Container vs field-grown:
- Container-grown trees can often be moved without prior root pruning, but they’re frequently root-bound. You may need to slice or tease roots open so they don’t keep circling in the new hole.
- Field-grown (B&B) trees live by their root ball. Proper sizing, wrapping, and handling make or break their survival.
- Protect the trunk and branches: Use moving blankets, padding, or cardboard under straps and chains so you’re not gouging bark or cracking limbs during loading and hauling.
- Minimize time out of ground: Don’t let the tree sit on a trailer all day in full sun. Keep the root ball shaded and damp, then get it into its new hole as quickly as is practical.
Hidden cost many miss: A 4–6 inch caliper tree with a proper root ball can weigh several thousand pounds. That weight shows up in your tree transplant cost Tampa in the form of loaders, cranes, extra crew, and careful site access planning.
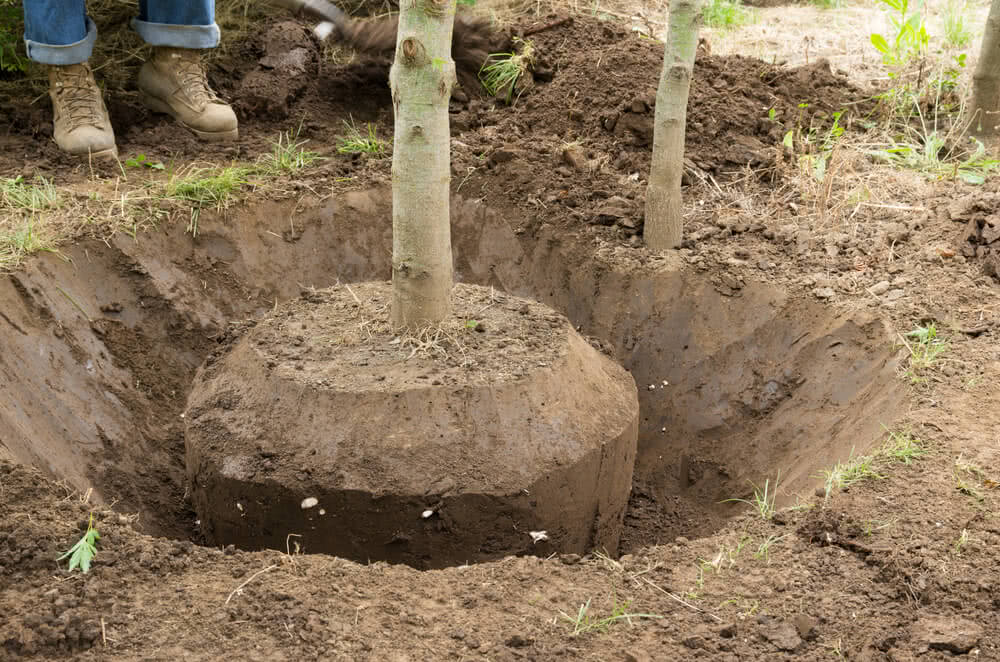
Step 4 — New Hole Preparation
The new planting hole is not just a hole. In Tampa’s sandy soils, the way you prepare it will decide if the tree dries out constantly or sits in a wet pocket. The goal is fast drainage with enough organic matter in the root zone to hold moisture between waterings.
- Width: Dig the hole about 2× the width of the root ball. On compacted or construction-disturbed sites, going even wider helps roots escape the “glazed” soil and get into better ground.
- Depth: Match the root ball depth so the root flare ends up slightly above surrounding grade. That keeps you out of trouble when the soil settles.
- Sidewall preparation: Rough up the vertical sides of the hole with a shovel or rake so they’re not slick and compacted. Roots will push into loosened, fractured soil much more readily.
Tampa sandy soil transplant preparation
- Soil amendment recommended: Blend in roughly 20–30% compost by volume with the backfill. That boosts water-holding capacity and nutrient retention without turning the planting hole into a different soil “bucket” that holds water.
- Drainage consideration: Our Tampa sands are generally fast-draining. You’re usually fighting dryness, not standing water, unless you’re close to a pond, retention area, or high water table.
- Mulch depth: Plan for 2–3 inches of organic mulch over the root zone after planting, tapering off near the trunk to prevent rot.
- Root stimulator application: This is a logical point to plan for a root stimulator or mycorrhizal inoculant. You can mix it with the backfill or use it in the water you apply right after planting.
Step 5 — Planting & Backfill
Getting the tree into the ground at the right height and orientation is more important than any fancy product you add. A well-set tree in plain soil beats a poorly planted tree in “perfect” soil every time.
- Set the root ball: Lower the tree into the hole supporting the ball, not hanging from the trunk. Step back and check from at least two directions to make sure the tree is straight.
- Check elevation: Locate the root flare and make sure it’s at or just above the final soil grade. If you can’t find the flare, remove some soil from the top of the ball until you do.
- Remove or loosen wrapping:
- Cut away all synthetic burlap. That plastic mesh doesn’t rot and can girdle roots.
- For natural burlap, peel it back from the top and sides of the ball. Leaving some under the base is usually acceptable if it’s truly natural fiber.
- With a wire basket, cut and fold the top third down and away from the trunk so roots and trunk aren’t pinched later.
- Backfill: Use a mix of native soil and up to 20–30% compost. Add soil in layers, gently firming with your hands or feet to knock out air pockets, but don’t stomp and compact it like a fence post.
- Mycorrhizal inoculant: In Tampa’s poorer sands, a mycorrhizal inoculant can help the tree access water and nutrients sooner. Work it into the backfill zone or water it in per product directions.
- Staking: Stake only if the tree leans, rocks in the wind, or has a big canopy on a small root ball. Use flexible straps, not wire on bare bark, and plan to remove all stakes within 6–12 months.
Note: If you’re working with native species, check our separate native tree planting guide. Natives often have slightly different handling quirks, but the core transplanting principles still apply.
Step 6 — Watering & Mulching
The last step on planting day is locking in moisture and protecting the new root zone. This is where a lot of people underdo it or just walk away too early.
- Watering-in: As you backfill, slowly run water into the hole so the soil settles around the roots and air pockets collapse. You want the entire root ball and backfill evenly moist, not just the top couple of inches.
- Mulch ring: Spread a 2–3 inch layer of mulch out to at least the edge of the root ball, and ideally 2–3 feet beyond. Keep mulch 2–3 inches away from the trunk to prevent moisture sitting on the bark.
- Water basin: In sand, a low berm at the outer edge of the root zone helps pool water over the ball so it soaks in instead of running off. You can flatten this out once the tree is established.
Post-Transplant Care for Tampa’s Sandy Soil
Most transplant failures I see don’t happen on digging day. They happen in the months after, when watering gets inconsistent and the tree is still trying to re-grow roots in hot, dry soil.
In Tampa, the establishment period is usually 12–36 months. Bigger the tree, longer the timeline.
Irrigation Schedule Post-Transplant
Here’s a practical watering schedule for newly transplanted trees in Tampa’s fast-draining sands. Treat this as a starting point and adjust for rain, species, and actual soil moisture.
- First 2 weeks: Water daily. Aim for slow, deep soaking that wets the entire root ball and some of the surrounding backfill.
- Weeks 3–4: Drop back to every other day, still focusing on deep soaking rather than quick sprinkles.
- Months 2–3: Water 2–3 times per week. In hotter or windier periods, you may lean toward the high end of that range.
- Months 4–6: Water 1–2 times per week, depending on rainfall and how quickly the soil dries between irrigations.
- Months 7–12: Ease into weekly or biweekly deep waterings if natural rainfall is close to normal.
Trees over 4 inches trunk caliper are still recovering long after that first year. Many of them need extended supplemental irrigation for 24–36 months, especially through our hottest months.
Mulching, Root Stimulators & Fertilization
- Mulch depth: Keep 2–3 inches of mulch over the root zone year-round. Top it off as it breaks down, but don’t stack it into a “mulch volcano” against the trunk.
- Root stimulator: A mild root stimulator with low nitrogen and micronutrients at planting and again a few weeks later can support root activity without forcing too much top growth.
- Mycorrhizal inoculant: These fungi form partnerships with roots and can make a noticeable difference in dry, sandy, low-organic soils. Early in the establishment period is the best time to apply them.
- Fertilization delay: Hold off on heavy fertilizers for at least 6 months. High nitrogen right after transplant often pushes leafy growth the roots can’t support yet.
If you want more detail on fertilizers and product choices, check our evergreen fertilization guide where we dig into nutrient timing and formulations rather than transplant logistics.
Staking & Structural Support
- When to stake: Stake if the tree rocks in the root ball when you push it, has a large canopy compared to the ball, or sits in a very windy or exposed spot.
- Duration: In Tampa, 6–12 months is usually enough. Past that, the tree needs to move naturally to build trunk strength.
- Method: Use wide, flexible straps or hose-covered wire, and anchor to solid posts outside the root ball zone. Check ties regularly and remove them before they start to bite into the bark.
Transplant Shock: Signs, Prevention & Recovery
Transplant shock happens on almost every move, especially with larger trees. Your goal isn’t to avoid it completely. You want to keep it mild and temporary.
In Tampa’s climate, most trees need 1–3 years to fully recover and get back to strong, normal growth.
Common Signs of Transplant Shock
- Symptom onset: You’ll often see signs 7–21 days post-transplant, though in hot, windy conditions it can be sooner.
- Leaves: Watch for wilting, leaf curl, yellowing, or browning on the tips and edges. Sometimes only the outer canopy shows it at first.
- Leaf drop: Light to moderate leaf drop is common. If more than 50–75% of the canopy sheds, that tree is in serious stress and needs careful attention.
- Growth: A transplanted tree may not put out much new shoot or leaf growth for a season or more. That pause can be normal if the canopy looks stable and doesn’t keep thinning.
- Fatal indicators: Branches that are brittle and fail the “scratch test” (no green just under the bark), dieback starting at the top and working downward, and a canopy that fails to leaf out normally over multiple seasons.
Preventing Transplant Shock
- Proper root ball sizing: Stick with the 10–12 inches per inch of trunk caliper rule. Undersizing the ball is one of the fastest ways to cook a tree.
- Root pruning lead time: Give yourself at least 3–6 months of lead time for medium trees, more for big ones or sensitive species.
- Right timing: Whenever you have a choice, schedule the move between November and February in Tampa.
- Soil prep: Follow the Tampa sandy soil transplant preparation basics. Decent compost, proper mulching, and irrigation setup all help buffer stress.
- Water management: Stick to a consistent watering plan. Avoid extremes of “bone dry then flood” and watch for standing water in low spots.
- Shade and wind protection: For sensitive species or summer transplants, temporary shade cloth or windbreaks can make the difference between survival and failure.
Recovery Timeline in Tampa’s Climate
- Small trees (≤2″ caliper): Often re-establish in about 12–18 months, sometimes faster if they were well-rooted and handled carefully.
- Medium trees (3–4″ caliper): Usually need 18–30 months before they resume strong, predictable growth.
- Large trees (>4″ caliper): Expect 24–36+ months, especially if they were moved without a tree spade or came from a stressed site.
During this establishment period, don’t expect the tree to look like it’s on fertilizer commercials. As long as the canopy holds steady or slowly improves each year and dieback doesn’t spread, you’re headed in the right direction.
How Panorama Tree Care Transplants Trees in Tampa (How We Do It!)
Panorama Tree Care doesn’t treat transplanting as a simple “dig and drop” job. In Tampa’s climate and sandy soils, we follow a structured, research-based system that stacks the odds in the tree’s favor.
Here’s what that looks like on a typical project.
1. ISA Arborist Assessment & Viability Check
We start every transplant with an on-site review by an ISA-certified arborist. Not every tree is a good candidate, and sometimes the smartest move is saying no.
- Health assessment: We inspect for decay, cavities, previous bad pruning, pest damage, and root issues like girdling or heaving.
- Species and age: Some trees handle transplanting well, others don’t. Older, slow-growing, or brittle species are often poor candidates no matter how careful the process.
- Site conditions: We compare the current and future locations for sunlight, space, overhead lines, soil depth, drainage, and nearby structures.
- Cost vs value: We talk through tree transplant cost Tampa versus the cost and benefit of planting a new tree. Sometimes planting a well-chosen young tree makes more sense long-term.
2. Root Pruning Plan & Scheduling
Once we decide a tree is worth moving, we map out a root pruning plan that fits the species and the schedule.
- Lead time: Typically 3–6 months ahead of the move. For larger trees, we lean closer to the long end of that window.
- Phased pruning: For high-value or sensitive trees, we sometimes prune one section of the root system at a time in phases to keep stress under control.
- Watering and mulching: As soon as we root prune, we set up a pre-transplant care plan that includes mulching and a customized watering schedule.
3. Choosing Between Tree Spade & Hand Digging
For many mid-sized landscape trees, a tree spade machine is our first choice, assuming we can physically get it to the tree without tearing up the property.
- Trunk diameter capacity: Many of our spade setups handle trees up to about 4–6 inches caliper, which covers a lot of residential and commercial relocations.
- Root ball diameter cut: Our spades cut uniform root balls in the 40–72 inch range, depending on the job and the machine we send.
- Success rate: For trees in that size range, spades usually give a higher or at least more consistent survival rate than hand digging because the ball shape and size are precise.
- Cost per transplant: In Tampa, these jobs often run from the high hundreds into the low or mid thousands, depending on tree size, equipment needed, access issues, and how far we’re moving the tree.
- When we hand dig: If there’s tight gate access, utility conflicts, delicate hardscapes, or smaller specimen work, careful hand digging still has a place.
4. Custom Soil Amendment for Tampa Sands
Our crews don’t use a one-size-fits-all soil recipe. Tampa yards can vary a lot, from clean beachy sand to fill with shell, rock, or clay pockets. We adjust prep to match what’s actually in the ground.
- We typically add the right amount of compost (often 20–30% of the backfill) to give sandy soil some structure and moisture-holding power without creating those perched water tables.
- We shape the planting area so it’s fast-draining but still holds irrigation water over the root ball long enough to soak in. Mulch is a big part of that strategy.
- We selectively use mycorrhizal inoculants and gentle root stimulators where they’ll do the most good, especially for trees going into poor, low-organic sites.
5. Establishment Monitoring (12 Months+)
On higher value moves, our work doesn’t stop when the shovel leaves the ground. Our transplant packages often include post-transplant establishment monitoring for at least the first year, and more for large trees.
- ISA monitoring visits: We schedule check-ins, such as at 1, 3, 6, and 12 months, to look at canopy color, leaf density, new growth, soil moisture, and any early warning signs.
- Adjusting irrigation: We help fine-tune irrigation runtimes, emitter placement, and frequency so the tree isn’t being drowned or dried out between visits.
- Pruning guidance: We advise on best pruning time after transplant for that species, so any structural or corrective pruning supports the new root system instead of stressing it further.
Expert insight: The big win in hiring a pro often isn’t the machinery on moving day. It’s having a trained eye tracking the tree through the entire establishment period, so small problems get fixed before they become fatal.
Common Mistakes When Transplanting Trees in Tampa (And How to Fix Them)

- Mistake 1: Moving the tree in peak summer heat
Problem: The tree loses water faster than its reduced roots can replace it, and failure rates spike.
Fix: Whenever possible, shift the job to November–February. If you absolutely can’t, set up shade, wind protection, and very careful irrigation and soil monitoring. - Mistake 2: Undersizing the root ball
Problem: Too many roots are left behind, and the tree’s energy reserves crash trying to support the canopy.
Fix: Stick with the 10–12 inches per inch of trunk caliper guideline. If your equipment and access can support it, err on the larger side in sandy soils. - Mistake 3: Planting too deep
Problem: Burying the trunk flare traps moisture against bark that’s not meant to stay wet and often leads to decay and instability.
Fix: Make sure the root flare is visible and slightly above the surrounding soil. If the tree is already in and too deep, carefully remove soil from around the trunk and improve drainage away from the base. - Mistake 4: Poor water management in sandy soils
Problem: Roots either dry out between waterings or sit in low spots that stay soggy and oxygen-starved.
Fix: Build a consistent watering schedule for Tampa sands and adjust based on actual soil moisture, not just the calendar. A simple soil probe or even a hand dig can tell you a lot. - Mistake 5: Skipping root pruning
Problem: All the root cutting happens on moving day, leaving a sparse, coarse root system inside the ball.
Fix: For anything bigger than a small sapling, plan for 3–6 months of root pruning before the move so you have new feeder roots inside the future ball. - Mistake 6: Ignoring site suitability
Problem: You move a tree into a spot with the wrong light, crowded roots, or poor drainage, and it struggles for years even if the transplant itself went fine.
Fix: Evaluate the new site for sun exposure, overhead and underground conflicts, soil depth, and room to grow. If you decide moving the tree isn’t wise, check our guide on trees for Tampa and pick a species that fits that spot from day one.
FAQ: How to Transplant a Tree in Tampa
What is the maximum size tree that can be transplanted?
With the right equipment, you can move very large trees using cranes, custom boxes, and heavy machinery. In practical terms for most Tampa projects, though, you’re usually looking at 4–6 inches trunk caliper as the upper limit for standard tree spades, and up to 8–10 inches with more specialized setups and budgets. Past that point, cost, risk, and logistics start climbing quickly.
How much does it cost to transplant a tree in Tampa?
Tree transplant cost in Tampa depends on trunk size, root ball size, access for equipment, how far the tree is moving, and how much aftercare is included. Small trees that can be moved by a small crew may run in the low hundreds. Larger relocations that need loaders, spades, or cranes can move into the low to mid thousands per tree. A site visit is almost always needed to firm up a real quote.
Can I transplant a large tree myself?
Realistically, DIY work is best kept to small trees, usually in the 2–3 inch caliper range or smaller, and even then only if you can safely handle the root ball weight. Once you’re dealing with root balls weighing several hundred pounds or more, it’s time to think hard about specialized equipment, trained crews, and liability.
What is the success rate for tree transplants?
With good timing, correct root ball sizing, proper soil prep, and disciplined aftercare, small to mid-sized trees can have a high success rate. Survival drops on larger trees, in summer moves, or in poor, compacted soils. Professional work guided by UF/IFAS-style best practices tends to outperform ad-hoc jobs by a wide margin.
When is transplanting not worth the risk?
Transplanting may be not worth the risk if the tree is already declining, has serious structural defects, is extremely large, or the new site is clearly a bad fit for light, space, or soil. In those cases, you’re often better off planting a new, well-chosen tree. For ideas that suit our area, take a look at our page on trees for Tampa.
How long does it take a transplanted tree to establish in Tampa?
Most transplanted trees need an establishment period of 12–36 months. A rough rule many of us use in the field is about 1 year per inch of trunk caliper for full re-establishment, especially on larger trees.
Is it better to transplant native species?
For most Tampa yards, native tree planting wins because natives are usually better adapted to Tampa’s heat, rainfall patterns, and local pests, so they often settle in more easily than some exotics. But technique still matters. Even natives can fail if the move, soil, or watering are handled poorly. If you’re focusing on natives, check our separate guide on transplanting native species and new native tree planting.
Should I prune the canopy when I transplant a tree?
Light structural pruning to remove dead, rubbing, or badly placed branches can be useful, but heavy canopy reduction right after transplant is usually a bad idea. The tree needs leaves to produce energy to rebuild roots. Focus on root-friendly care first and follow species-specific advice and local guidelines on best pruning time for any larger pruning work.
Final Summary & Next Steps
Transplanting a tree in Tampa can absolutely be done, but it’s not a casual weekend project once the tree is any size. Long-term success comes down to a handful of non-negotiables:
- Choosing the right season, ideally November–February.
- Respecting proper root ball diameter and depth based on trunk caliper.
- Building in 3–6 months of root pruning and pre-transplant care for anything beyond a small tree.
- Preparing Tampa’s sandy soil with smart compost use, drainage, and mulch, not random “garden soil” thrown in a hole.
- Following a steady, realistic watering schedule through the full establishment period.
- Watching for transplant shock and adjusting shade, irrigation, or staking before problems snowball.
If you’re torn between moving a tree or starting fresh with a better-suited species, it’s usually worth getting advice from someone who handles both transplanting new trees and selecting the right trees for Tampa conditions day in and day out.
Ready to relocate a tree in Tampa? Reach out to Panorama Tree Care to schedule an ISA-certified assessment and a tailored transplant plan, from the first root pruning cut to the last establishment monitoring visit.
Contact Tampa Bay tree service company for a free assessment and estimate.